OS X’s Time Machine is a fabulous backup solution for Macs. But it relies on you dragging your Mac “back to base”, either by plugging into a USB disc or to an expensive Time Capsule.
This guide will walk you through configuring Time Machine to backup to a cloud server in just 20 minutes. By doing this, the backup will work from anywhere where you have an internet connection, and you won’t have to worry about hardware maintenance.
Things you need
- A Linux-based server running a Virtual Private Network (VPN). Your server allows Time Machine to communicate securely over the internet and provides storage for your backups. if you don’t already have a server, you can read more about what exactly you need below.
- A Mac OS X machine from 10.7 (Lion) onwards.
- A ‘fast’ upstream internet connection. We recommend that you ensure your Mac can connect with at least 10Mbps upstream.
What kind of server do I need?
You can use the same server to back up several Macs, and Time Machine’s data encryption means that your data is safe even if you’re sharing one. You don’t need an expensive server – a £10/month cloud server from Bytemark will do the job.
Step 1: Get yourself a cloud server
You’ll need your own Linux-based server to follow this guide. You’ll need to understand how to use SSH to run commands, and to edit files on it.
You can sign up to Bytemark’s cloud servers in about 5 minutes – they’ll let you expand your storage as you need more. We’d suggest you start with twice as much storage as you’ve used on your Mac, to allow for plenty of backup history to build up.
So e.g. if you have 100GB used on your Mac, start your server off with 200GB storage space.
To commission your server at Bytemark, go to Add Cloud Server and select the following:
- Name: (e.g.) cloudcapsule
- Performance: Can be left at 1 core / 1GB RAM
- Distribution: Debian (jessie)
- Discs:
- Leave the root disc with a type of SATA (SSD) and size of 25GB
- Add a second disc with e.g. 200GB storage space (be sure to select “Archive storage”)

You can then click “Add this server” and your server should be created for you in about five minutes.
Don’t forget to note down your server’s hostname and root password

Step 2: Set up the disc and network
You’ll now need to log into your server using the root password, e.g. on my account this was:
ssh root@cloudcapsule.default.matthew.uk0.bigv.io
Since you’re going to be installing a lot of packages, if you’re not using a Bytemark server you should make sure your package list is up-to-date by running:
apt-get update
Now you can set up the network configuration for your VPN with these two commands:
echo '
auto vpn
iface vpn inet static
    address 10.10.11.1
    netmask 255.255.255.0
    pre-up ip link add vpn type dummy
    post-down ip link del vpn
' >> /etc/network/interfaces

ifup vpn
And attach the extra storage like this:
apt-get install -y btrfs-tools
mkdir /store
mkfs.btrfs /dev/vdb
echo '/dev/vdb /store btrfs defaults 0 0' >>/etc/fstab
mount /store
Finally make a folder for your time machine backups:
mkdir /store/timemachine
Step 3: Set up some passwords
There are four parameters you need to set up and write down for future reference:
- VPN Group Name (this should just be ‘vpn’)
- VPN Group Secret
- Your VPN login name
- Your VPN password
Here’s how to set them all up before we start installing software, and so you can write them all down at once. It’s really important that you do write these passwords down and keep the record somewhere safe, otherwise you may find yourself unable to restore later.
VPN Group Name and Secret
Here’s how to generate a secure VPN Secret:
apt-get install -y apg
mkdir -p /etc/racoon
echo "vpn `apg -m16 -n1`" >/etc/racoon/psk-new.txt
cat /etc/racoon/psk-new.txt
Your secret will be printed out at the terminal, make sure you write it down and file it away.
Username and password
Now add your username and password to the server (this is your VPN login name, so substitute ‘matthew’ for whatever you prefer):
adduser --gecos "" matthew
You can decide your own VPN login password; it’ll prompt you for that next. But if it’s not a password you’ll remember, write it down and store it somewhere safe.
Once you’ve added your username, you need to make sure your server’s storage folder is writeable by this new user. So the simplest possible solution is:
chown matthew /store /store/timemachine
(again substitute “matthew” for whatever your username is)
Step 4: Build the software to run the Apple Filing Protocol
We need to install Netatalk, but it needs building from source which takes a few minutes. Netatalk serves up a remote disc to your Mac, and Time Machine connects to it.
Type the following to fetch, build and install the software:
# install everything we need to build netatalk (3 mins)
apt-get install -y build-essential libevent-dev libssl-dev libgcrypt-dev libkrb5-dev libpam0g-dev libwrap0-dev libdb-dev libtdb-dev libmysqlclient-dev avahi-daemon libavahi-client-dev libacl1-dev libldap2-dev libcrack2-dev systemtap-sdt-dev libdbus-1-dev libdbus-glib-1-dev libglib2.0-dev libio-socket-inet6-perl tracker libtracker-sparql-1.0-dev libtracker-miner-1.0-dev

# download and extract netatalk (30s)
wget -O- http://downloads.sourceforge.net/project/netatalk/netatalk/3.1.9/netatalk-3.1.9.tar.bz2?ts=`date +%s` | tar jx

# build and install netatalk (5-10 minutes)
cd netatalk*
./configure --with-init-style=debian-systemd
make
make install
Once that’s finished, you can verify the installation by typing:
afpd -V
You should get a response from the system confirming that “afpd 3.1.9 – Apple Filing Protocol (AFP) daemon of Netatalk” is installed.
Step 4: Configure the VPN
The VPN is fairly quick to install, and the only extra piece of software you need is ‘racoon’ which deals with accepting connections from your Mac. You can install it quickly with:
DEBIAN_FRONTEND=noninteractive apt-get install -y racoon
mv /etc/racoon/psk{-new,}.txt
chmod 600 /etc/racoon/psk.txt
Next you should put this file under /etc/racoon/racoon.conf:
log info;
path pre_shared_key "/etc/racoon/psk.txt";
path certificate "/etc/racoon/certs";

listen {
        isakmp 0.0.0.0 [500];
        isakmp_natt 0.0.0.0 [4500];
}

remote anonymous {
        exchange_mode main,aggressive;
        lifetime time 2147483 second;
        proposal {
                encryption_algorithm aes 256;
                hash_algorithm sha2_256;
                authentication_method xauth_psk_server;
                dh_group modp2048;
        }
        passive on;
        generate_policy unique;
        nat_traversal on;
}

mode_cfg {
        auth_source pam;
        pool_size 16;
        network4 10.10.11.128;
        netmask4 255.255.255.128;
        split_network include 10.10.11.0/25;
        save_passwd on;
        banner ""; # disables the banner, no such file will be found
}

sainfo anonymous {
        lifetime time 2147483 second;
        encryption_algorithm aes;
        authentication_algorithm hmac_sha1;
        compression_algorithm deflate;
}
You need to change 0.0.0.0 for the primary IP of your server. You can do that automatically with these three commands:
cd /etc/racoon
sed "s/0.0.0.0/`ifconfig eth0 | grep -oP 'inet addr:\K\S+'`/" <racoon.conf >racoon.conf2
mv racoon.conf{2,}
Now you can restart the VPN service with this command and it should be ready for a connection:
systemctl restart racoon
Step 4: Set up and test your VPN
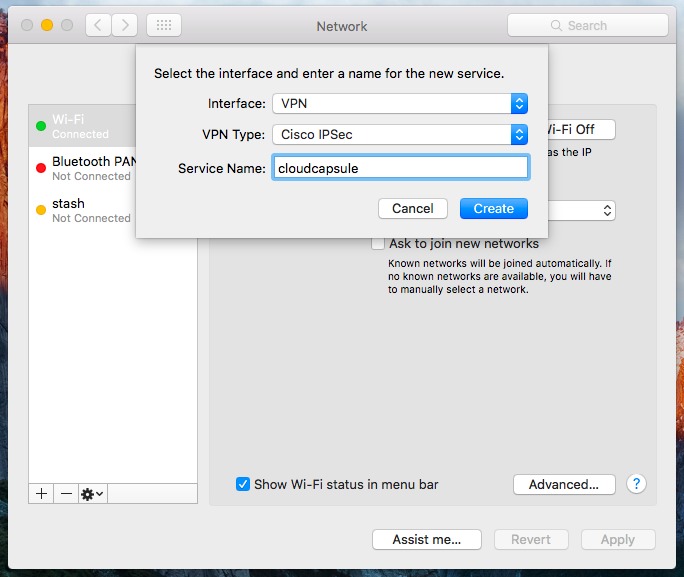
On your Mac, open System Preferences and go to the Network panel, then click the + button at the bottom left to add a new network connection.
Select:
- Interface: VPN
- VPN type: Cisco IPSec
- Service name: cloudcapsule
Then click Create.
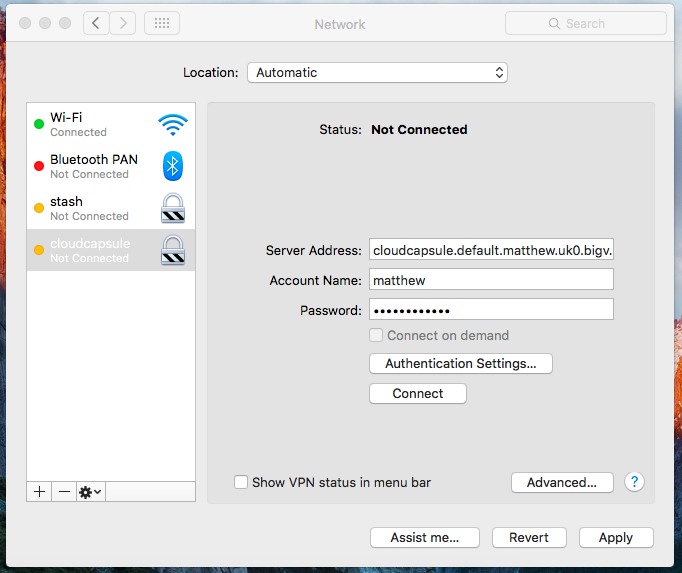
Then on the main screen enter:
- Server address: (your server’s hostname) (e.g. “cloudcapsule.default.matthew.uk0.bigv.io”)
- Account Name: (your VPN login name) (e.g. “matthew”)
- Password: (your VPN password) (whatever you entered after “adduser” above)
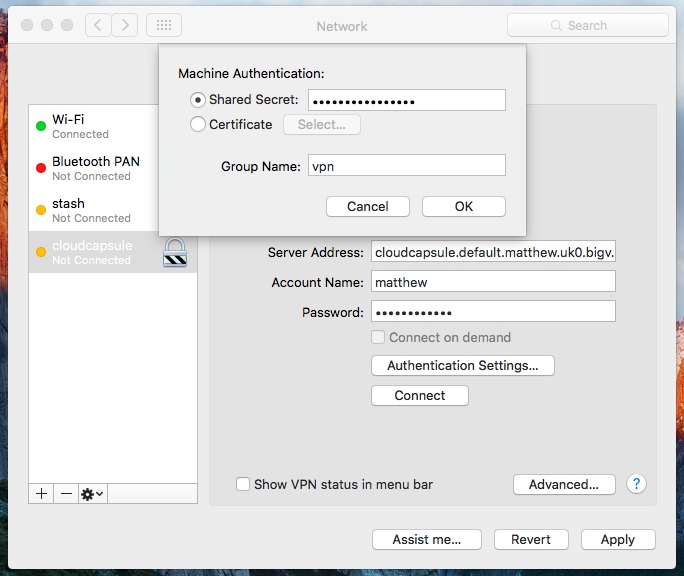
Under Authentication Settings:
- Shared Secret: (your VPN Group secret)
- Group Name: vpn
Finally press Apply in the bottom-right, then Connect.
If all goes well, you see the VPN status change to Connected. To double-check this, press ⌘+SPACE and open Terminal, then type:
ping 10.10.11.1
If you see a response of the sort:
64 bytes from 10.10.11.1: icmp_seq=0 ttl=58 time=34.600 ms
Your VPN is up, you can close the Terminal window and proceed to the next step.
Step 5 (optional): Make sure the VPN stays up
As things stand, you have a working VPN. But every time you turn off your computer or change its network connection, it stops until you start it again.
You can do this manually if you prefer, and if you forget, Time Machine will eventually complain that it can’t back up. But you probably want to make it connect automatically.
There are more elegant ways to do this, but this is a “fire and forget” method that will cause your VPN connection to retry every minute. Just press ⌘+Space and enter Terminal, then run this command:
printf "`crontab -l 2>/dev/null`* * * * * /usr/sbin/scutil --nc connect vpn\n" | crontab
You can test that it works by Disconnecting your VPN from the Network Preferences panel, and observing that within a minute, the connection re-establishes itself.
Step 6: Set up the Time Machine share
Back on your server, you now need to set up netatalk. This only needs one file putting in place, which is /usr/local/etc/afp.conf:
[Global]
afp listen = 10.10.11.1
mimic model = TimeCapsule6,106
log level = default:warn
log file = /var/log/afpd.log

[Homes]
basedir regex = /home

[Cloud Capsule]
path = /store/timemachine
time machine = yes
Once that file is in place, restart the service with:
service netatalk restart
Check that it’s alive by typing:
service netatalk status | grep -i active
Assuming it comes back and tells you its “active (running)”, usually in green, your server setup should be finished.
Step 7: Connect to your server
Back on your Mac, you can now connect to your server.
Click on the Finder (left-hand side of the dock), and press ⌘+K to connect to your server.
Enter:
afp://10.10.11.1
You should then be prompted to enter your VPN login name and your VPN password (NOTE not your Mac login!)
When that works, you should see an empty folder open – that’s your home directory on the server, which we don’t need, but proves that the connection is working, and that we can set up Time Machine.
Step 8: Set up Time Machine
Now that you have a connection to your server, you can set up Time Machine.
You’ll need to do this from the Terminal again, so hit ⌘+SPACE and enter Terminal.
Then enter this command, which needs you to substitute in your VPN login name and VPN password again:
sudo tmutil setdestination "afp://(your VPN login name):(your VPN password)@10.10.11.1/Cloud Capsule"
so e.g. if your username is “matthew” and password is “shazam” you’d type:
sudo tmutil setdestination "afp://matthew:shazam@10.10.11.1/Cloud Capsule" # EXAMPLE WON'T WORK!
OS X will ask you to enter your Mac password to confirm this command. There’ll be a pause of 10-20s, and it will come back to a prompt without a message.
If you now open System Preferences and go into Time Machine, you should see “Cloud Capsule” as the backup destination.
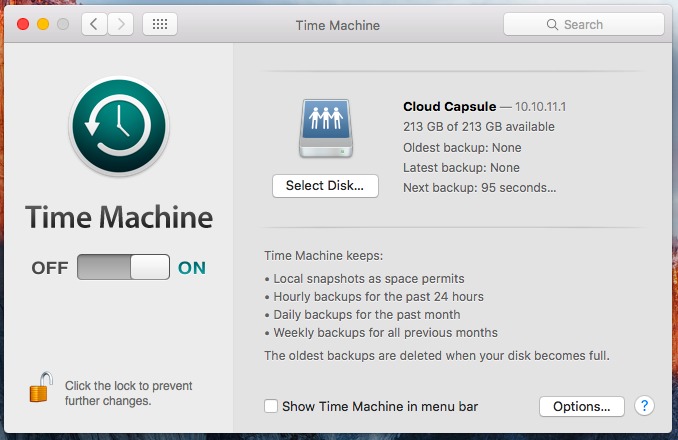
You should now be able to follow Apple’s instructions to start your first backup.
Step 9: Make sure that first backup completes!
The backup speed is completely dependent on your upstream internet connection, which is often a lot less than your downstream e.g. you might get 24Mbps downstream, but only 2Mbps upstream.
If you have a 2Mb upstream internet connection, and 80GB of data to back up on your computer, it will take 5 full days to upload. So if you have a lot of data, you might want to take your Mac to a faster internet connection temporarily to get it done.
Unfortunately Time Machine won’t be able to back up over our VPN during Power Nap.
Once the first backup is complete, you should find subsequent backups are much easier on your connection.