You can add up to 4 extra IPv4 addresses to your Cloud Server through the Bytemark Panel by following these steps:
- Log in to Bytemark Panel.
- Click the ‘Networking‘ button in the top menu.
- Select ‘Add IP address‘ section of your server options.
- Choose which cloud server to route the IP address to.
Updating your operating system
Once you have added a new IP, you will need to update your operating system before it will recognise it. Please follow the instructions for your operating system below.
Method for Debian / Ubuntu
Edit the file /etc/network/interfaces using your preferred text editor with root privileges eg. sudo nano /etc/network/interfaces. The contents of the file will probably look something like this:
auto eth0
 iface eth0 inet static
 address 1.2.3.4
 netmask 255.255.255.0
 broadcast 1.2.3.255
 gateway 1.2.3.1
We need to add two lines of code so the extra IP address is set up and torn down each time the system boots up and shuts down. Copy and paste the following lines of code underneath the existing file contents, replacing 10.20.30.40 with your new IP address and indenting it to match the lines above it:
 post-up ip addr add 10.20.30.40/32 dev eth0
 pre-down ip addr del 10.20.30.40/32 dev eth0
When you have made your changes, save the file, and then run the following command to bring up the IP straight away (to save us from having to reboot the system):
ip addr add 10.20.30.40/32 dev eth0
Your IP address should now be available (you should see it listed if you run the command ip addr). Repeat the process for any additional IP addresses.
Method for CentOS
To add an extra IP address to an existing interface, we make a copy of the existing interface file, adding a colon and a number to the end of the filename eg. to add an extra IP address to eth0 we would run:
cp /etc/sysconfig/network-scripts/ifcfg-eth0 /etc/sysconfig/network-scripts/ifcfg-eth0:0
Note: If the file
ifcfg-eth0:0already existed, we would simply add 1 to the number on the end to getifcfg-eth0:1
Once we have created the new file, we need to edit it to change the following fields:
- DEVICE — This should match the end of the filename ie.
eth0:0for the fileifcfg-eth0:0oreth0:3for the fileifcfg-eth0:3. - IPADDR — Add your new IP address here ie. replace 10.20.30.40 in the example below.
- NETMASK — Enter
255.255.255.255as the subnet mask (or enter the subnet mask for your private VLAN if this IP is from that range).
The contents of your file will probably look something like the following example, although it may contain more lines:
DEVICE=eth0:0
BOOTPROTO=static
IPADDR=10.20.30.40
NETMASK=255.255.255.255
ONBOOT=yes
When you have made your changes, save the file, and then run the following command to restart the network service:
sudo service network restart
Your IP address should now be available (you should see it listed if you run the command ip addr). Repeat the process for any additional IP addresses.
Method for Windows
- Connect to your Windows server using remote desktop connection.
- Open ‘Network and Sharing Center‘ (by right-clicking the network monitor icon in the system tray and selecting it from the menu, or by searching for it from the Start menu).

- Click the ‘Change adapter settings‘ link (towards the top-left of the window).
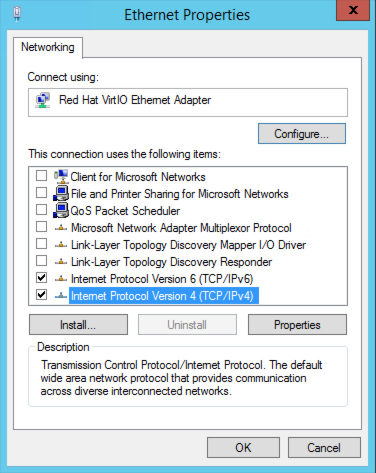
- Right-click your network connection eg. ‘Ethernet‘, and select ‘Properties‘ from the menu.
- Single-click the ‘Internet Protocol Version 4 (TCP/IPv4)‘ option to highlight it (ensure the checkbox remains ticked) and click the ‘Properties‘ button.
- Click the ‘Advanced‘ button.
- Click the ‘Add...’ button at the bottom of the ‘IP addresses‘ section of the window.
- Enter the new IP address and ‘
255.255.255.255‘ as the subnet mask (or enter the subnet mask for your private VLAN if this IP is from that range) and click the ‘Add‘ button. - Click the ‘OK‘ button to close the previous windows.
Your IP address is now available to be used. Repeat the process if you want to add another IP.