Matomo — previously known as Piwik — is a free and open source alternative to Google Analytics. Self-host your own Matomo server to take control of your data!
In 5 minutes you’ll have Matomo running with Docker, Let’s Encrypt SSL certificates (via Traefik), and automatic updates.
If you’ve got your own server already — whether at Bytemark or not — skip the Create a Cloud Server section and run our setup script on your server instead.
Create a Cloud Server
- Login to the Bytemark Panel (or start a free trial).
- Add a Cloud Server with these settings:
- Name: Give your server a name (eg, “matomo”)
- Group: Leave as “default”
- Resources: 1 Core, 1GiB Memory
- Operating System: Debian 9
- Discs: 25GiB SSD storage
- Backup Schedule: Leave enabled (recommended)
- Boot options: Select Add script and paste this inside:
#!/bin/sh
export DEBIAN_FRONTEND=noninteractive

# Wait for apt-get to be available.
while ! apt-get -qq check; do sleep 1s; done

# Install docker-ce and docker-compose.
apt-get update
apt-get install -y apt-transport-https ca-certificates curl gnupg2 software-properties-common
curl -fsSL https://download.docker.com/linux/debian/gpg | apt-key add -
add-apt-repository "deb [arch=amd64] https://download.docker.com/linux/debian `lsb_release -cs` stable"
apt-get update
apt-get install -y docker-ce
curl -fsSL https://github.com/docker/compose/releases/download/1.21.2/docker-compose-`uname -s`-`uname -m` -o /usr/local/bin/docker-compose
chmod +x /usr/local/bin/docker-compose

# Check for security updates every night and install them.
apt-get install -y unattended-upgrades

# Retrieve configuration files. Lots of explanatory comments inside!
# If you'd rather inspect and install these files yourself, see:
# https://github.com/BytemarkHosting/configs-matomo-docker
mkdir -p /root/compose
curl -fsSL https://raw.githubusercontent.com/BytemarkHosting/configs-matomo-docker/master/docker-compose.yml -o /root/compose/docker-compose.yml
curl -fsSL https://raw.githubusercontent.com/BytemarkHosting/configs-matomo-docker/master/.env -o /root/compose/.env
curl -fsSL https://raw.githubusercontent.com/BytemarkHosting/configs-matomo-docker/master/traefik.toml -o /root/compose/traefik.toml
curl -fsSL https://raw.githubusercontent.com/BytemarkHosting/configs-matomo-docker/master/php.ini -o /root/compose/php.ini

# Traefik needs a file to store SSL/TLS keys and certificates.
touch /root/compose/acme.json
chmod 0600 /root/compose/acme.json

# Use the hostname of the server as the main domain.
sed -i -e "s|^TRAEFIK_DOMAINS=.*|TRAEFIK_DOMAINS=`hostname -f`|" /root/compose/.env
sed -i -e "s|^MATOMO_DOMAINS=.*|MATOMO_DOMAINS=`hostname -f`|" /root/compose/.env

# Fill /root/compose/.env with some randomly generated passwords.
sed -i -e "s|^MATOMO_DB_ROOT_PASSWORD=.*|MATOMO_DB_ROOT_PASSWORD=`cat /dev/urandom | tr -dc '[:alnum:]' | head -c14`|" /root/compose/.env
sed -i -e "s|^MATOMO_DB_PASSWORD=.*|MATOMO_DB_PASSWORD=`cat /dev/urandom | tr -dc '[:alnum:]' | head -c14`|" /root/compose/.env
sed -i -e "s|^MATOMO_ADMIN_PASSWORD=.*|MATOMO_ADMIN_PASSWORD=`cat /dev/urandom | tr -dc '[:alnum:]' | head -c14`|" /root/compose/.env
apt-get install -y apache2-utils
BASIC_AUTH_PASSWORD="`cat /dev/urandom | tr -dc '[:alnum:]' | head -c10`"
BASIC_AUTH="`printf '%s\n' "$BASIC_AUTH_PASSWORD" | tee /root/compose/auth-password.txt | htpasswd -in admin`"
sed -i -e "s|^BASIC_AUTH=.*|BASIC_AUTH=$BASIC_AUTH|" /root/compose/.env

# Start our containers.
cd /root/compose
docker-compose up -d
- Have a cup of tea! Matomo will be ready in 5 minutes.
- The Panel will tell you the root password for your server. Save it!
- Click on the Console button next to your Cloud Server. You’ll know installation has finished when you see a login prompt. You can login with username root.
After installation
In your browser, navigate to the hostname of your server (eg, http://name.of.server.uk0.bigv.io).
If you’re using your own domain, do that first before going through the setup wizard.
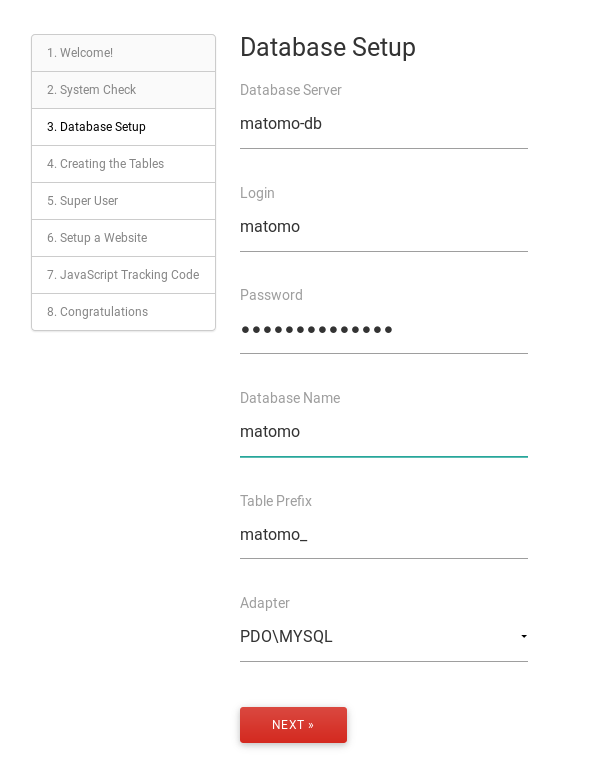
You’ll be greeted by Matomo’s setup wizard. Matomo will ask for some database information. You can find the password for the MySQL root user inside your Docker environment file:
cat /root/compose/.env | grep MATOMO_DB_PASSWORD
When Matomo asks for your database information, enter the following:
Follow the steps below to Use your own domain, Enable SSL/TLS and Enable outgoing email.
Use your own domain
Login to your Cloud Server and open /root/compose/.env in a text editor:
nano /root/compose/.env
Change MATOMO_DOMAINS to your own domain. (Do the same for TRAEFIK_DOMAINS if you want to access the Traefik dashboard.) For example:
MATOMO_DOMAINS=my-brilliant-site.com,www.my-brilliant-site.com
Restart your Docker containers to apply the change:
cd /root/compose
docker-compose down
docker-compose up -d
Enable SSL/TLS
Configure your own domain as per the previous step. All domains you list in
MATOMO_DOMAINSmust point to your server (via DNS records) for this to work.
Once you’ve done that, Traefik will generate Let’s Encrypt SSL certificates for you automatically! Browse to https://your_domain.com to see if it worked.
If you want to redirect all HTTP traffic to HTTPS (as is recommended these days), open /root/compose/traefik.toml in a text editor and uncomment two lines so that it looks like this:
[entryPoints]
  [entryPoints.http]
  address = ":80"
  # Uncomment the following two lines to redirect HTTP to HTTPS.
    [entryPoints.http.redirect]
    entryPoint = "https"
Open /root/compose/docker-compose.yml in a text editor. In the matomo: section, uncomment the bottom line so that it looks like this:
      # Uncomment the next line to enable HSTS header.
      - "traefik.frontend.headers.STSSeconds=15768000"
Restart your Docker containers to apply the change:
cd /root/compose
docker-compose down
docker-compose up -d
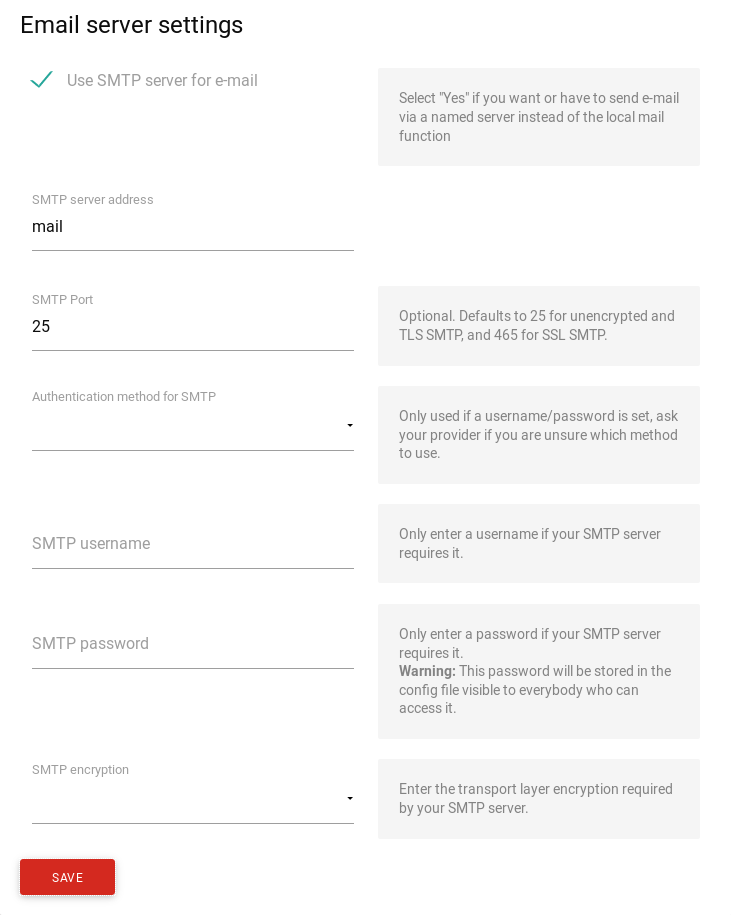
Enable outgoing email
On your Matomo site, go to Settings > General Settings > Email server settings. Set SMTP server address as “mail“, and SMTP Port as “25“:
Enable GeoLite2 databases
This is optional, but without it you’ll have less accurate location data on your visitors.
For better location tracking, use Maxmind’s GeoLite2 IP geolocation databases. Install the updater tool on your Cloud Server:
sudo apt-get update
sudo apt-get install -y geoipupdate
geoipupdate -V
The last command above tells you which version you’ve installed.
For versions older than 2.5.0, create a file called /etc/GeoIP.conf and put these contents inside:
UserId 0
LicenseKey 000000000000
ProductIds GeoLite2-Country GeoLite2-City GeoLite2-ASN
DatabaseDirectory /var/lib/GeoIP
For version 2.5.0 or newer, create a file called /etc/GeoIP.conf and put these contents inside:
AccountID 0
LicenseKey 000000000000
EditionIDs GeoLite2-City GeoLite2-Country GeoLite2-ASN
DatabaseDirectory /var/lib/GeoIP
Run this command to retrieve the databases:
sudo geoipupdate
Look inside /var/lib/GeoIP. There should be some files with .mmdb extension.
To auto-update the databases every week, open /etc/cron.d/geoipupdate and put this inside:
50 2 * * 4 root /usr/bin/geoipupdate
Open /root/compose/docker-compose.yml in a text editor. In the matomo: section, uncomment three lines to look like this:
# Use MaxMind GeoLite2 databases:
- /var/lib/GeoIP/GeoLite2-City.mmdb:/var/www/html/misc/GeoLite2-City.mmdb
- /var/lib/GeoIP/GeoLite2-Country.mmdb:/var/www/html/misc/GeoLite2-Country.mmdb
- /var/lib/GeoIP/GeoLite2-ASN.mmdb:/var/www/html/misc/GeoLite2-ASN.mmdb
Restart your Docker containers to apply the change:
cd /root/compose
docker-compose down
docker-compose up -d
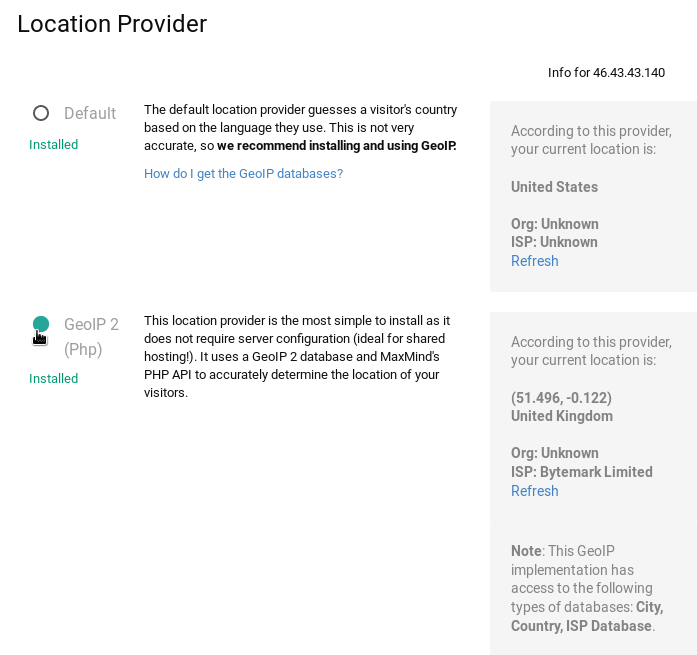
Finally, on your Matomo site, open Settings > Geolocation and switch to the second option called “GeoIP 2 (PHP)”:
It’s possible your IP may not show up correctly if you’re connecting from certain IPv6 addresses.
Technical details
Inside /root/compose you’ll find all the configuration files, which are taken from our Git repository. Feel free to browse around or adapt those configuration files to your needs.
-
- Traefik acts as a reverse proxy, listening on ports 80 and 443 and passing web traffic to the appropriate container based on rules you decide (eg, based on the URL). If domains are properly configured, it automatically retrieves Let’s Encrypt SSL certificates for you.
- Watchtower automatically updates your containers to the latest version. This keeps you secure.
- phpMyAdmin gives you access to view, modify and retrieve your database. For security, the phpMyAdmin dashboard is behind a browser login prompt using “admin” user and the password inside
/root/compose/auth-password.txt. You can find the database “root” user password inside the/root/compose/.envfile. - Our configuration installs a custom php.ini file, as some of PHP’s default settings are too restrictive and tend to cause headaches.
- Our bytemark/smtp image allows your Matomo server to send outgoing emails if needed (eg, password resets).