This guide explains how to set up a website on a Symbiosis server.
Open your web browser and enter the server’s name in the location bar, eg. http://example.default.bytemark.uk0.bigv.io. There is no default web page. You’ll see a 404 error when you try to access the website until you create a page.
Creating a Page
You can do this by uploading a simple index.html file to the directory /srv/example.default.bytemark.uk0.bigv.io/public/htdocs/ for example, as follows:
- Create a simple HTML file named
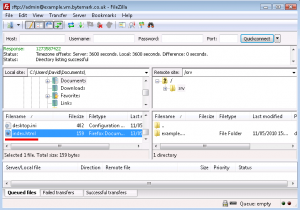
index.html. For the purposes of this example, let’s assume that the file is stored in theMy Documentsdirectory. - Start up FileZilla and connect to your server. The lower left-hand pane should display the contents of your
My Documentsdirectory, including yourindex.htmlfile (please navigate to the correct directory if it is not already selected). The/srv/directory will be shown in the right-hand pane.

- HTML files should be uploaded to the
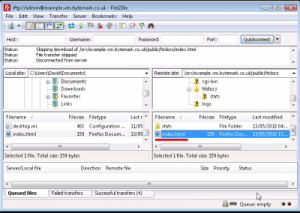
public/htdocs/directory. This can be found by revealing the contents ofsrv/by clicking the + to its left in the top-right hand pane. - Now right-click on
index.htmlin the lower left-hand pane, and select Upload from the menu. The file is uploaded to thehtdocs/directory on the server.

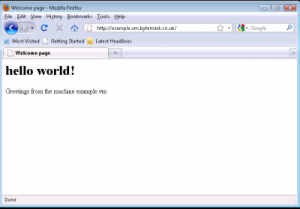
- Refresh your web browser to see the result.

Note: This example shows uploading a web page written in HTML, called
index.html. This file could also be written in PHP, in which case the file should be calledindex.php.
Hosting a web page using your own domain
The previous section dealt with setting up a web page using the default domain associated with the server. A Symbiosis system can host many domains without any extra configuration. This section deals with configuring a second domain.
It has been assumed both that your server is hosted at Bytemark, and that this second domain is using the Bytemark name servers.
For the purposes of this tutorial, the domain my-brilliant-site.com is being hosted on the server example.default.bytemark.uk0.bigv.io.
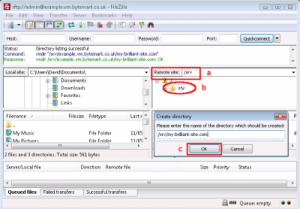
- With FileZilla connected to the server, make sure the
Remote sitetext field is pointed at the/srv/directory a. Right click on the folder iconb. - From the right-click menu select
Create directoryand in theCreate directorypop-up enter/srv/my-brilliant-site.com.

- Click the
OKbutton c to create the directory - Repeat this step to complete the domain tree with the directories
/srv/my-brilliant-site.com/public/and/srv/my-brilliant-site.com/public/htdocs/. - Create another
index.htmlfile. - Upload it as before, but this time into the
htdocs/directory in themy-brilliant-site.com/directory tree.
Within a hour, the DNS records for my-brilliant-site.com will be generated and uploaded to the Bytemark domain name servers. Navigating to that site will then show our new index page.
At this point, the site will also be visible at both my-brilliant-site.com and www.my-brilliant-site.com. This is part of the Symbiosis set-up; if different pages were required at www.my-brilliant-site.com, a separate directory tree should be created for www.my-brilliant-site.com, with a different content as needed.
Handling wildcard domains
By default, the contents of /srv/my-brilliant-site.com/public/htdocs/will be served for that domain as well as any subdomains of that domain, for example:
- my-brilliant-site.com/
- www.my-brilliant-site.com/
- test.my-brilliant-site.com/
- this.is.ridiculous.my-brilliant-site.com/
By default, Symbiosis will create DNS records for only the raw domain and the www subdomain. To use anything other than these, you will need to create further DNS records for either the specific subdomains you wish to serve, or a Wildcard DNS record to match anything else. Please see the reference manual for more information on how to do this.
If you wish to mandate a particular hostname for your sites that can be arranged via mod_rewrite, which is also discussed in the reference manual.
Testing a new domain
Symbiosis automatically generates test URLs for you, so you can access your content before you have pointed a domain to it. The test URL follows the format:
http://domain.testing.hostname
For example, to view the site my-brilliant-site.com hosted on the server example.default.bytemark.uk0.bigv.io, navigate to:
http://my-brilliant-site.com.testing.example.default.bytemark.uk0.bigv.io
This test URL is available as soon as you upload a index.html or index.php file.
Please note: There is no
wwwat the start of the testing URL.Also, this facility does not play well with certain directives that can be used in Apache
.htaccessfiles, especially rewrite rules.
Configuring SSL Hosting
By default, Symbiosis will try to use certificates from LetsEncrypt to secure your site. These certificates are free at the point of use and issued automatically. They are trusted by all modern browsers, and largely obviate the need to acquire certificates from commercial providers.
As a result no action is needed to configure SSL hosting for your sites as it will happen for you automatically. SSL Configuration gives more details on exactly how the mechanism works, and is worth reading if you wish to replace the LetsEncrypt certificates with some issued by a third party provider.
Note: Extra IP addresses are no longer needed to host multiple SSL-enabled sites on one server. Server Name Indication (SNI) is supported by all modern browsers, allowing multiple SSL sites on one IP. If you wish to use multiple IPs, then they can can be allocated in the normal way.
Making SSL mandatory
If you prefer to direct each visitor to the SSL-protected version of your site, you can achieve this by creating an empty file called ssl-only in the /srv/example.com/config/ directory (replacing example.com with your domain name) and then running sudo symbiosis-httpd-configure --verbose to apply the changes. When this setting is applied, the HSTS header is automatically sent.